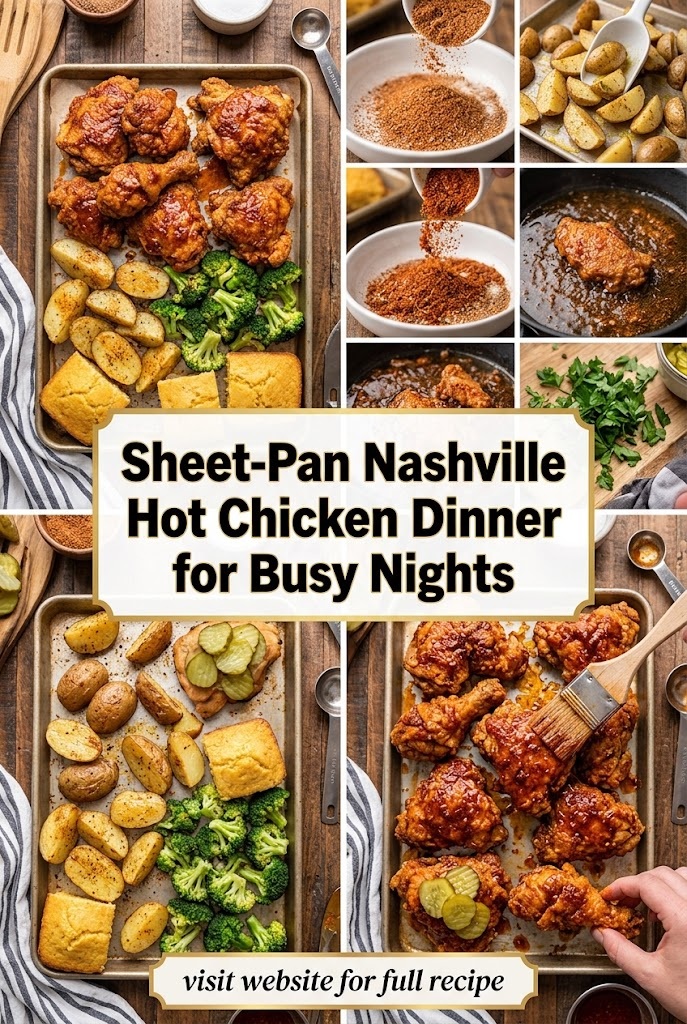
Sheet-Pan Nashville Hot Chicken Dinner for Busy Nights
A Spicy, Stress-Free Revelation for Busy Weeknights
In the pantheon of American comfort food, few dishes command as much respect, fear, and sheer devotion as Nashville Hot Chicken. Born in the heart of Tennessee, this fiery bird has transformed from a local secret into a global phenomenon. However, for the average home cook facing the “what’s for dinner?” dilemma on a Tuesday at 6:00 PM, the traditional method of deep-frying chicken in bubbling vats of spicy oil is—to put it mildly—a logistical nightmare.
Enter the Sheet-Pan Nashville Hot Chicken Dinner. This is the game-changer you’ve been waiting for. It captures the soul-shaking heat and addictive crunch of the original but reimagines it for the modern, time-strapped kitchen. By utilizing a single sheet pan, you can achieve succulent, spice-rubbed chicken and perfectly roasted vegetables with a fraction of the mess and none of the fryer-induced anxiety.
The Legend of the Heat: A Brief History of Nashville Hot Chicken
Before we dive into the mechanics of the sheet pan, we must pay homage to the roots. Legend has it that the dish was created in the 1930s by the girlfriend of Thornton Prince. Suspecting him of cheating, she sought revenge by dousing his Sunday morning fried chicken with an ungodly amount of cayenne pepper. The plan backfired spectacularly; Thornton loved it so much that he opened Prince’s Hot Chicken Shack, which still stands as a pilgrimage site for heat-seekers today.
While the original is deep-fried and served on white bread with pickles, our sheet-pan version honors that legacy of bold flavor while prioritizing health, convenience, and a complete, balanced meal.
Why the Sheet-Pan Method is Superior for Busy Nights
If you aren’t already a devotee of the sheet-pan movement, here is why this Nashville Hot Chicken iteration will convert you:
- Passive Cooking Time: Once the pan goes into the oven, your work is largely done. No standing over a stove dodging grease splatters. You have 30 minutes to help with homework, answer emails, or enjoy a glass of cold iced tea.
- Effortless Cleanup: One pan. One bowl for the sauce. That’s it. By lining your pan with parchment paper or heavy-duty foil, cleanup becomes a thirty-second task rather than a thirty-minute chore.
- Built-in Side Dishes: By roasting your chicken alongside potatoes and hearty greens, you ensure that the spicy drippings from the chicken season the vegetables, creating a cohesive flavor profile that you simply can’t get when cooking components separately.
- Healthier Profile: While we aren’t exactly calling this “diet food,” roasting uses significantly less oil than traditional deep-frying, allowing the natural flavors of the chicken and spices to shine without the heavy saturated fat of a fryer.
Anatomy of the Perfect Sheet-Pan Nashville Chicken
To achieve “Google-ranked” greatness in your own kitchen, you need to understand the components that make this dish sing.
1. The Protein: Thighs vs. Breasts
For a sheet-pan dinner, bone-in, skin-on chicken thighs are the undisputed champion. They are forgiving in the high heat of an oven, staying juicy while the skin crisps up. If you prefer chicken breasts, ensure they are thick and keep the skin on to prevent them from drying out during the roasting process.
2. The “Crunch” Factor
Since we aren’t deep-frying, we use a specialized dry rub. A mixture of flour, cornstarch (the secret to extra crispiness), and a heavy hand of spices creates a “crust” that mimics the texture of fried chicken.
3. The Holy Trinity of Heat
Nashville Hot Chicken is defined by three things: Cayenne Pepper, Brown Sugar, and Smoked Paprika.
- Cayenne: The source of the heat.
- Brown Sugar: Provides the essential caramelization and balances the fire.
- Smoked Paprika: Adds a deep, earthy red color and a hint of wood-smoke flavor.
4. The “Mop” Sauce
The signature of Nashville Hot Chicken is the spicy oil brushed on at the end. In our sheet-pan version, we whisk together a bit of the chicken’s own rendered fat (or melted butter/oil) with more spices to create a “glaze” that is applied during the final minutes of cooking.
Ingredients You Will Need
To serve a family of four, gather the following high-quality ingredients:
For the Chicken & Veggies:
- 4-6 Large Chicken Thighs (Bone-in, skin-on)
- 1 lb Baby Yukon Gold Potatoes (Halved)
- 1 lb Brussels Sprouts (Trimmed and halved) or Broccoli Florets
- 2 tbsp Olive Oil
- 1 tsp Kosher Salt
- 1 tsp Cracked Black Pepper
For the Crispy Dry Rub:
- 1/2 cup All-purpose Flour
- 1 tbsp Cornstarch
- 1 tbsp Cayenne Pepper (Adjust based on heat tolerance)
- 1 tbsp Garlic Powder
- 1 tbsp Onion Powder
- 1 tsp Smoked Paprika
For the Nashville Hot Glaze:
- 1/3 cup Neutral Oil (or melted unsalted butter)
- 2 tbsp Cayenne Pepper (For “Medium” heat)
- 1 tbsp Brown Sugar
- 1 tsp Chili Powder
- 1/2 tsp Garlic Powder
- 1/2 tsp Salt
The Essential Garnish:
- Dill Pickle Chips (Cold and crunchy)
- White Bread Slices (To soak up the juices)
- Fresh Parsley (Optional, for color)
Step-by-Step Instructions for Success
Step 1: Prep and Preheat
Preheat your oven to 425°F (220°C). This high temperature is crucial for rendering the chicken fat and crisping the skin. Line a large, rimmed baking sheet with parchment paper or foil.
Step 2: Season the Vegetables
Place your halved potatoes and Brussels sprouts directly on the baking sheet. Drizzle with olive oil, salt, and pepper. Toss them thoroughly and spread them to the outer edges of the pan, leaving the center open for the chicken.
Step 3: The Dry Rub Application
In a shallow bowl, whisk together the flour, cornstarch, and the dry rub spices. Pat the chicken thighs completely dry with paper towels (moisture is the enemy of crispiness). Dredge each thigh in the flour mixture, shaking off the excess, and place them in the center of the baking sheet.
Step 4: The First Roast
Slide the pan into the oven. Roast for 25-30 minutes. You are looking for the potatoes to be tender when pierced with a fork and the chicken skin to begin turning a golden brown.
Step 5: Prepare the Nashville “Mop”
While the chicken roasts, whisk together your glaze ingredients in a small bowl. The brown sugar should be mostly dissolved into the oil/butter.
Step 6: The Glaze and Final Crisp
Remove the pan from the oven. Using a pastry brush, generously coat the top of each chicken thigh with the Nashville Hot Glaze. If you have extra glaze, you can lightly drizzle a tiny bit over the potatoes for a “spicy potato” vibe. Return the pan to the oven for another 5-10 minutes, or until the chicken reaches an internal temperature of 165°F and the glaze is bubbling.
Step 7: The Rest and Serve
Let the chicken rest for 5 minutes. This allows the juices to redistribute. Serve each portion with a slice of white bread underneath the chicken to catch the spicy oil, and top with plenty of cold dill pickles.
Scaling the Scovilles: How Hot is Your Kitchen?
One of the best things about making Nashville Hot Chicken at home is that you are the master of the “Heat Scale.” Restaurants usually offer a range from “Plain” to “Shut the Cluck Up.” Here is how to adjust your sheet-pan version:
- Mild: Use 1 tsp of Cayenne in the rub and 1/2 tbsp in the glaze. Substitute some cayenne with extra smoked paprika.
- Medium: Follow the recipe as written (2 tbsp Cayenne in the glaze). This provides a solid kick that lingers but doesn’t cause pain.
- Nashville Hot: Use 3-4 tbsp of Cayenne in the glaze and add a teaspoon of red pepper flakes to the dry rub.
- Nuclear: Add a pinch of Ghost Pepper powder or Carolina Reaper flakes to the glaze. Proceed with extreme caution and have plenty of milk on standby.
The Science of Sogginess: How to Keep it Crispy
The biggest complaint with sheet-pan chicken is often that the bottom of the chicken becomes soggy from sitting in the vegetable juices. Here are three professional tips to combat this:
- The Wire Rack Method: Place a wire cooling rack on top of your baking sheet and put the chicken on the rack. This allows hot air to circulate under the chicken, crisping it 360 degrees while the juices drip down onto the vegetables below.
- The Space Factor: Do not overcrowd the pan. If the vegetables are piled on top of each other, they will steam instead of roast. Use two pans if necessary.
- Preheat the Pan: Put the empty baking sheet in the oven while it preheats. When you place the oiled potatoes and floured chicken onto a hot pan, they start searing immediately.
Perfect Pairings: What to Serve with Your Sheet-Pan Feast
While the potatoes and sprouts included in this recipe make it a complete meal, you can elevate the experience with these Southern-inspired sides:
- Creamy Coleslaw: The acidity and creaminess of a vinegar-based or mayo-based slaw provide the perfect structural contrast to the heat of the chicken.
- Macaroni and Cheese: If you have an extra 20 minutes, a stovetop mac and cheese acts as a “fire extinguisher” for the palate.
- Honey Drizzle: A popular modern twist is serving Nashville Hot Chicken with a side of “Hot Honey” or plain honey to lean into the sweet-and-spicy “swicy” trend.
- Beverages: Reach for something cold and slightly sweet. An ice-cold Lager, a dry Hard Cider, or a classic Southern Sweet Tea are the best companions for spicy poultry.
Nutritional Benefits of the Sheet-Pan Approach
By choosing to roast rather than deep-fry, you are making a significantly heart-healthier choice.
- Lower Acrylamide: Deep-frying at very high temperatures can create acrylamides in starchy foods; roasting is a gentler (though still high-heat) process.
- Vitamin Retention: Roasting vegetables like Brussels sprouts and potatoes at high heat for a shorter duration helps retain more Vitamin C and Vitamin K compared to boiling.
- Capsaicin Boost: The cayenne pepper isn’t just for heat; capsaicin is known to boost metabolism and promote heart health by improving circulation.
Variations for Different Diets
The beauty of the Nashville Hot flavor profile is its versatility. You can adapt this recipe to suit almost any dietary restriction:
- Keto/Low-Carb: Replace the flour and cornstarch in the dry rub with crushed pork rinds or almond flour. Swap the potatoes for cauliflower florets or radishes (which taste remarkably like potatoes when roasted!). Use a sugar-free sweetener instead of brown sugar in the glaze.
- Gluten-Free: Simply swap the all-purpose flour for a high-quality 1-to-1 gluten-free flour blend. Ensure your chili powder doesn’t contain hidden gluten fillers.
- Paleo: Use coconut flour for the dredging and ghee instead of oil or butter for the glaze. Replace the white bread with a large lettuce wrap.
Meal Prep and Storage
This recipe is a meal-prepper’s dream.
Storage: Store leftovers in an airtight container for up to 4 days. Reheating: Avoid the microwave! To keep the chicken crispy, reheat it in an oven or air fryer at 350°F for 8-10 minutes. The potatoes will also crisp back up beautifully this way. Freezing: You can freeze the seasoned, uncooked chicken thighs in a freezer bag. When ready to eat, thaw them overnight in the fridge and proceed with the roasting steps.
Frequently Asked Questions (FAQ)
Can I use boneless chicken?
Yes, but reduce the cooking time. Boneless, skinless thighs or breasts will cook in about 15-20 minutes. Keep a close eye on them to ensure they don’t dry out.
Why use white bread?
In Nashville, the white bread is traditional. It acts as a “sponge” for the spicy oil that drips off the chicken. By the time you finish the chicken, the bread is saturated with flavor and is often considered the best part of the meal.
Is Nashville Hot Chicken too spicy for kids?
It can be. If cooking for a family with varying heat tolerances, consider roasting the chicken with just the dry rub (omitting the cayenne in the rub) and only applying the “Hot Glaze” to the adult portions at the end.
What if I don’t have a sheet pan?
A large cast-iron skillet or a 9×13 baking dish will work, though the vegetables may be a bit more crowded and less “crispy-roasted.”
The Final Verdict
The Sheet-Pan Nashville Hot Chicken Dinner is more than just a recipe; it’s a strategy for reclaiming your evening. It proves that you don’t have to sacrifice bold, regional flavors for the sake of convenience. Whether you are a heat-junkie looking for your next fix or a busy parent trying to spice up the weekly rotation, this dish delivers on every front.
The combination of the succulent chicken, the caramelized vegetables, and that iconic, glowing red Nashville glaze creates a sensory experience that rivals any restaurant. Best of all, when the meal is over and the family is satisfied, you aren’t left with a kitchen covered in grease—just one pan to rinse and a night left to enjoy.
So, grab your cayenne, preheat that oven, and get ready to bring the heat of Music City right to your dinner table. Your busy nights just got a whole lot more flavorful.