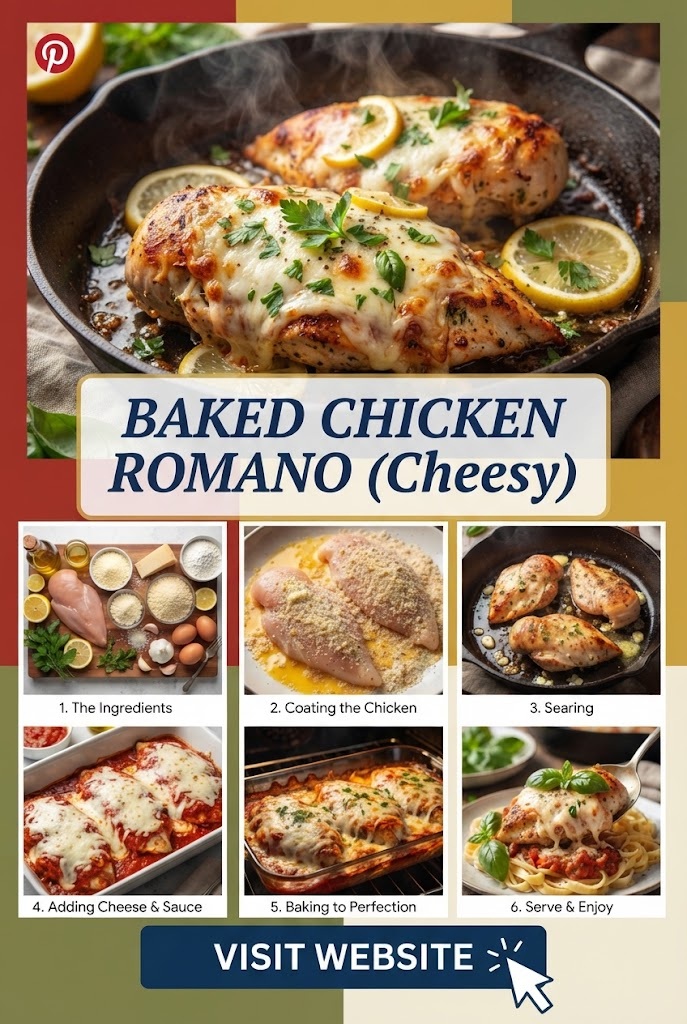
Baked Chicken Romano (Cheesy)
Baked Chicken Romano (Cheesy) — Crispy, Golden & Family-Favorite
Baked Chicken Romano is a deliciously comforting chicken dinner featuring tender chicken breasts coated in a golden Romano cheese crust. The outside becomes crisp and savory while the inside stays juicy and flavorful. It is an excellent alternative to fried chicken when you want something satisfying without standing over a skillet.
This recipe combines grated Romano cheese, Parmesan, seasoned breadcrumbs, garlic, Italian herbs, and a little olive oil to create a flavorful coating that bakes beautifully in the oven. The chicken is first lightly coated so the Romano crust adheres well, then baked until golden brown and completely cooked through.
The result is a restaurant-style chicken dish that is simple enough for a weeknight dinner but impressive enough for guests.
Why You’ll Love This Baked Chicken Romano
There are plenty of reasons to add this recipe to your regular dinner rotation.
Crispy without deep frying: The cheesy breadcrumb coating becomes golden and crunchy in the oven.
Packed with flavor: Romano cheese gives the crust a salty, nutty, slightly sharp flavor that pairs wonderfully with chicken.
Juicy chicken: Properly prepared chicken breasts remain tender and moist beneath the crispy coating.
Easy ingredients: Most of the ingredients are pantry and refrigerator staples.
Family-friendly: The cheesy crust makes plain chicken much more exciting, even for picky eaters.
Versatile: Serve it with pasta, vegetables, salad, potatoes, or rice.
Perfect for entertaining: The chicken can be prepared ahead of time and baked when dinner is ready.
Complete Baked Chicken Romano Recipe
Recipe Overview
Recipe Name: Baked Chicken Romano
Cuisine: Italian-American
Course: Main Course
Preparation Time: 20 minutes
Marinating/Resting Time: 10–15 minutes
Cooking Time: 20–30 minutes
Total Time: About 55–65 minutes
Servings: 4
Difficulty: Easy to Moderate
Ingredients
For the Chicken
- 4 boneless, skinless chicken breasts, about 6–8 ounces each
- 1 teaspoon kosher salt
- ½ teaspoon black pepper
- 1 teaspoon Italian seasoning
- ½ teaspoon garlic powder
- ½ teaspoon onion powder
For the Romano Cheese Coating
- ¾ cup finely grated Romano cheese
- ½ cup finely grated Parmesan cheese
- 1 cup Italian-seasoned breadcrumbs
- 2 tablespoons plain breadcrumbs or panko breadcrumbs
- 1 teaspoon garlic powder
- 1 teaspoon Italian seasoning
- ½ teaspoon paprika
- ¼ teaspoon black pepper
- ¼ teaspoon salt, or to taste
- 2 tablespoons chopped fresh parsley, optional
For the Egg Mixture
- 2 large eggs
- 2 tablespoons milk
- 1 teaspoon Dijon mustard
- 1 tablespoon freshly grated Parmesan cheese
- 1 small garlic clove, finely minced, optional
For the Baking
- 2 tablespoons olive oil
- 1 tablespoon melted butter
- Cooking spray, as needed
- Lemon wedges, for serving
- Fresh parsley, for garnish
Ingredient Notes
Chicken Breasts
Boneless, skinless chicken breasts are ideal for this recipe. However, chicken breasts can vary significantly in thickness. Very thick breasts may brown on the outside before the center is finished.
For even cooking, gently pound the chicken to approximately ½ to ¾ inch thickness.
You can also use chicken cutlets, which are already thin and cook quickly.
Romano Cheese
Romano cheese is the star of this recipe. It has a stronger, saltier flavor than many mild cheeses, which gives the chicken its distinctive taste.
Freshly grated Romano is preferred because it melts and blends into the breadcrumb mixture better than very coarse pre-shredded cheese.
Pecorino Romano is an excellent choice if you want a particularly bold cheese flavor.
Because Romano cheese is naturally salty, be careful not to over-season the coating.
Parmesan Cheese
Parmesan adds nuttiness and helps balance the sharper flavor of Romano cheese.
Using both cheeses creates a richer and more complex crust than using either cheese alone.
Freshly grated Parmesan is ideal, but a good-quality packaged grated Parmesan can also work.
Breadcrumbs
Italian-seasoned breadcrumbs make the recipe particularly easy because they already contain herbs and seasonings.
For an extra-crispy coating, replace some of the breadcrumbs with panko.
A combination of regular breadcrumbs and panko gives you both flavor and crunch.
Eggs
Eggs create the adhesive layer between the chicken and cheese coating.
Whisk them thoroughly with milk and Dijon mustard so the mixture coats the chicken evenly.
How to Prepare Baked Chicken Romano
Step 1: Preheat the Oven
Preheat your oven to 425°F (220°C).
A properly preheated oven is important because the chicken needs immediate exposure to high heat to develop a golden crust.
Lightly grease a large baking sheet or baking dish with cooking spray.
For an even crispier bottom, place a wire rack over a baking sheet and lightly grease the rack.
The rack allows hot air to circulate around the chicken.
Step 2: Prepare the Chicken
Place each chicken breast between two pieces of plastic wrap or parchment paper.
Using the flat side of a meat mallet, gently pound the chicken until it reaches approximately ½ to ¾ inch thickness.
Do not pound aggressively. The goal is to create an even thickness rather than flatten the chicken excessively.
Even chicken breasts cook much more consistently.
If your chicken breasts are extremely large, you can cut them horizontally into thinner cutlets.
Step 3: Season the Chicken
In a small bowl, combine:
- Salt
- Black pepper
- Italian seasoning
- Garlic powder
- Onion powder
Sprinkle the seasoning mixture evenly over both sides of the chicken.
Gently press the seasoning into the meat.
Allow the chicken to sit for about 10 minutes while you prepare the coating.
This short resting period allows the seasoning to begin working into the surface of the chicken.
Step 4: Make the Romano Cheese Coating
In a wide, shallow bowl, combine:
- ¾ cup Romano cheese
- ½ cup Parmesan cheese
- 1 cup Italian breadcrumbs
- 2 tablespoons plain or panko breadcrumbs
- 1 teaspoon garlic powder
- 1 teaspoon Italian seasoning
- ½ teaspoon paprika
- ¼ teaspoon black pepper
- Salt, if needed
- Fresh parsley, if using
Mix everything thoroughly.
The cheese should be evenly distributed throughout the breadcrumbs.
Important Tip
Taste a tiny amount of the dry coating before adding the chicken.
If your Romano cheese is very salty, you may not need additional salt.
This simple step can prevent the finished chicken from becoming overly salty.
Step 5: Prepare the Egg Wash
In another shallow bowl, whisk together:
- 2 eggs
- 2 tablespoons milk
- 1 teaspoon Dijon mustard
- 1 tablespoon Parmesan
- Minced garlic, if using
Whisk until smooth.
The Dijon mustard will not make the chicken taste strongly of mustard. Instead, it adds a subtle savory flavor and helps the coating adhere.
Step 6: Coat the Chicken
Take one seasoned chicken breast and dip it into the egg mixture.
Turn it over so both sides are completely coated.
Allow excess egg to drip back into the bowl.
Next, place the chicken into the Romano breadcrumb mixture.
Press the coating firmly onto both sides.
Do not simply sprinkle the coating over the chicken. Gently pressing helps create a thick, even crust.
Repeat with the remaining chicken breasts.
Step 7: Arrange the Chicken
Place the coated chicken breasts on your prepared baking sheet or wire rack.
Make sure there is space between each piece.
Do not overcrowd the pan.
Air circulation helps the coating become crisp.
Drizzle the tops lightly with olive oil or spray them with cooking spray.
You can also combine the olive oil with melted butter and lightly brush it over the coating.
The fat helps the Romano crust develop a beautiful golden color.
Step 8: Bake the Chicken
Place the chicken in the preheated 425°F oven.
Bake for approximately 20–30 minutes, depending on the thickness of the chicken.
Thin chicken cutlets may finish in around 18–22 minutes.
Thicker chicken breasts may require closer to 25–30 minutes.
The most reliable method is to check the internal temperature.
The thickest part of the chicken should reach 165°F (74°C).
Avoid relying only on the color of the meat or the coating.
A digital meat thermometer gives you the most reliable result.
Step 9: Check the Crust
Around the halfway point, check the chicken.
The coating should gradually become golden brown.
If the crust is browning too quickly while the chicken still needs more cooking, loosely cover the chicken with foil.
If the chicken is cooked but the coating is not as golden as you want, place it under the broiler for approximately 1–2 minutes.
Watch carefully during broiling because the cheese can burn quickly.
Step 10: Rest the Chicken
Remove the baked chicken from the oven.
Allow it to rest for 5 minutes before serving.
Resting is important because it gives the juices time to redistribute throughout the chicken.
Cutting immediately can cause more juices to escape, making the chicken seem drier.
Step 11: Garnish and Serve
Transfer the chicken to a serving platter.
Sprinkle with fresh chopped parsley.
Serve with fresh lemon wedges.
A small squeeze of lemon over the crispy Romano crust adds brightness and balances the richness of the cheese.
What Makes the Romano Crust So Good?
The coating works because every ingredient contributes something different.
The Romano cheese provides salty, savory intensity.
The Parmesan adds nuttiness.
The breadcrumbs create structure and crunch.
The Italian seasoning adds herbs.
The garlic provides savory depth.
The paprika adds subtle warmth and attractive color.
The egg wash binds everything together.
The olive oil and butter help the crust brown and crisp.
Together, these ingredients produce a coating that is crispy, cheesy, fragrant, and deeply savory.
How to Keep the Chicken Juicy
One of the most common problems with baked chicken breasts is dryness.
Fortunately, there are several easy ways to prevent it.
Use Even Thickness
Pounding the chicken creates uniform thickness.
Without this step, the thinner sections may become dry while the thick center is still cooking.
Don’t Overcook
Chicken breast does not need to be cooked far beyond 165°F.
Use a thermometer and remove the chicken when it reaches the recommended safe internal temperature.
Let It Rest
Five minutes of resting helps retain moisture.
Don’t Skip the Egg Wash
The coating helps protect the surface of the chicken during baking.
Avoid Extremely Thin Chicken
Very thin chicken cutlets cook quickly and can dry out if left in the oven too long.
How to Make the Coating Extra Crispy
If crispy chicken is your priority, try these techniques.
Use Panko
Replace ¼ to ½ cup of regular breadcrumbs with panko.
Panko creates larger, lighter crumbs and produces a crispier texture.
Use a Wire Rack
Place the chicken on a greased wire rack over a baking sheet.
This allows hot air to circulate beneath the chicken.
Don’t Overcrowd
Leave space between pieces.
Add a Little Oil
A light spray or drizzle of olive oil helps the breadcrumb mixture brown.
Preheat the Pan
For an especially crisp bottom, preheat the baking sheet in the oven before adding the chicken. Carefully place the coated chicken onto the hot pan.
Can You Use Chicken Thighs?
Absolutely.
Boneless, skinless chicken thighs work beautifully with this recipe.
They are naturally more forgiving because they contain more fat than chicken breasts.
Pound them lightly if necessary so they have an even thickness.
Because chicken thighs can vary in size, use internal temperature rather than cooking time alone to determine doneness.
Can You Use Chicken Tenders?
Yes.
Chicken tenders are perfect when you want a quicker version.
Coat them using the same egg and Romano mixture.
Because they are smaller, they will generally cook faster than full chicken breasts.
Begin checking them early to prevent overcooking.
Serving Suggestions
Baked Chicken Romano is versatile enough to serve with almost any side dish.
Pasta
Serve the chicken over spaghetti, linguine, or fettuccine.
A simple marinara sauce makes an excellent accompaniment.
You can also serve it with creamy Alfredo sauce.
Garlic Mashed Potatoes
Creamy mashed potatoes provide a comforting contrast to the crunchy Romano coating.
Add roasted garlic, butter, and a little Parmesan for even more flavor.
Roasted Vegetables
Try:
- Broccoli
- Cauliflower
- Zucchini
- Bell peppers
- Asparagus
- Brussels sprouts
- Carrots
Roast the vegetables with olive oil, garlic, salt, and pepper.
Green Salad
A crisp green salad provides freshness and acidity.
Try lettuce, cucumber, tomatoes, red onion, and a simple lemon vinaigrette.
Rice
Steamed white rice, brown rice, or seasoned rice can turn the chicken into a complete meal.
Roasted Potatoes
Crispy roasted potatoes pair especially well with the cheesy crust.
Season them with garlic, Italian herbs, olive oil, salt, and pepper.
Sauce Ideas for Chicken Romano
Although the chicken is flavorful enough to serve without sauce, a dipping or finishing sauce can make it even better.
Marinara Sauce
Warm marinara provides acidity that cuts through the richness of the cheese.
Serve it on the side or spoon a small amount underneath the chicken.
Lemon Butter Sauce
Melt butter with fresh lemon juice, garlic, and parsley.
Drizzle lightly over the chicken just before serving.
Garlic Cream Sauce
Combine cream, garlic, Parmesan, black pepper, and a little Italian seasoning.
Serve the sauce underneath or beside the chicken.
Tomato Basil Sauce
A simple tomato sauce with fresh basil provides a bright Italian-inspired accompaniment.
Make-Ahead Instructions
You can prepare the chicken several hours before baking.
Prepare the chicken, season it, coat it, and place it on a parchment-lined tray.
Cover it loosely and refrigerate.
When ready to cook, remove it from the refrigerator while the oven preheats.
Because cold chicken can take slightly longer to cook, use a thermometer rather than relying strictly on the stated baking time.
For the best crust, do not prepare the coated chicken too far in advance because moisture can gradually soften the breadcrumbs.
Storage Instructions
Allow leftover chicken to cool.
Place it in an airtight container and refrigerate.
Properly refrigerated cooked chicken should generally be consumed within 3–4 days.
For best texture, store the chicken separately from sauces and wet side dishes.
How to Reheat Baked Chicken Romano
The oven is the best option for maintaining the crispy coating.
Preheat the oven to 375°F (190°C).
Place the chicken on a wire rack over a baking sheet.
Heat until warmed through.
You can also use an air fryer.
Set the air fryer to approximately 350°F and heat until the chicken is hot and the coating has crisped again.
Microwaving is convenient but tends to soften the crust.
If you must use a microwave, reheat briefly and then transfer the chicken to a hot skillet or oven to restore some crispness.
Freezing Instructions
Baked Chicken Romano can be frozen, although the coating may not be quite as crisp after thawing and reheating.
For best results, allow the cooked chicken to cool completely.
Wrap individual portions tightly.
Place them in a freezer-safe container or bag.
Label with the date.
Freeze for up to approximately 2–3 months for best quality.
Reheat from thawed for the most even texture.
An oven or air fryer is preferable to a microwave.
Common Mistakes to Avoid
Using Too Much Salt
Romano and Parmesan are both naturally salty.
Season carefully.
Skipping the Preheat
A fully heated oven helps the crust brown properly.
Using Wet Breadcrumbs
If the egg mixture is dripping heavily from the chicken, the coating can become soggy.
Let excess egg drip off before adding the breadcrumb mixture.
Not Pressing the Coating
Gently press the breadcrumbs and cheese onto the chicken so they adhere.
Overcrowding the Pan
Crowding creates steam and prevents the coating from becoming crisp.
Overcooking the Chicken
Cooking time varies according to thickness.
Always verify doneness with an instant-read thermometer.
Baked Chicken Romano Recipe Card
Ingredients
Chicken:
- 4 boneless, skinless chicken breasts
- 1 teaspoon kosher salt
- ½ teaspoon black pepper
- 1 teaspoon Italian seasoning
- ½ teaspoon garlic powder
- ½ teaspoon onion powder
Cheesy Coating:
- ¾ cup Romano cheese
- ½ cup Parmesan cheese
- 1 cup Italian breadcrumbs
- 2 tablespoons panko
- 1 teaspoon garlic powder
- 1 teaspoon Italian seasoning
- ½ teaspoon paprika
- ¼ teaspoon black pepper
- Salt, if needed
- 2 tablespoons fresh parsley
Egg Wash:
- 2 eggs
- 2 tablespoons milk
- 1 teaspoon Dijon mustard
- 1 tablespoon Parmesan
- 1 minced garlic clove, optional
For Baking:
- 2 tablespoons olive oil
- 1 tablespoon melted butter
- Lemon wedges
- Fresh parsley
Directions
- Preheat oven to 425°F (220°C).
- Pound chicken breasts to an even ½–¾-inch thickness.
- Season both sides with salt, pepper, Italian seasoning, garlic powder, and onion powder.
- Combine Romano, Parmesan, breadcrumbs, panko, garlic powder, Italian seasoning, paprika, pepper, and parsley.
- Whisk eggs, milk, Dijon mustard, Parmesan, and optional garlic.
- Dip each chicken breast into the egg mixture.
- Press each piece firmly into the Romano breadcrumb mixture.
- Place chicken on a greased baking sheet or wire rack.
- Lightly drizzle or spray with olive oil.
- Bake for approximately 20–30 minutes, depending on thickness.
- Cook until the thickest part reaches 165°F (74°C).
- Rest for 5 minutes.
- Garnish with parsley and serve with lemon.
Tips for the Best Baked Chicken Romano
For the most delicious result, keep these simple tips in mind.
Use freshly grated cheese: It gives the coating better flavor and texture.
Pound the chicken evenly: This is one of the most important steps for juicy chicken.
Don’t oversalt: Romano and Parmesan already provide plenty of salt.
Use a rack: It encourages crispness underneath the chicken.
Add panko: A little panko makes the crust noticeably crunchier.
Use olive oil: A light coating helps the breadcrumbs brown.
Check temperature: Don’t guess when the chicken is done.
Rest before slicing: This helps retain the juices.
Finish with lemon: A squeeze of lemon makes the entire dish taste fresher.
Easy Variations
Spicy Chicken Romano
Add ½ teaspoon crushed red pepper flakes to the breadcrumb mixture.
For more heat, add a pinch of cayenne pepper.
Lemon Romano Chicken
Add 1 teaspoon finely grated lemon zest to the cheese coating.
Serve with extra lemon wedges.
Garlic Herb Romano Chicken
Increase the garlic powder and add dried parsley, oregano, and basil.
Fresh parsley can be sprinkled over the chicken after baking.
Mozzarella Romano Chicken
For a more indulgent version, sprinkle mozzarella over the chicken during the final few minutes of baking.
Bake until the mozzarella melts and becomes lightly golden.
Spinach Romano Chicken
Serve the baked chicken over sautéed spinach seasoned with garlic and lemon.
This creates a colorful and nutritious dinner.
Tomato Romano Chicken
Top the finished chicken with chopped fresh tomatoes, basil, and a small drizzle of balsamic glaze.
The sweet acidity of the tomatoes complements the salty cheese crust.
Frequently Asked Questions
What is Chicken Romano?
Chicken Romano is chicken coated in a savory mixture featuring Romano cheese and breadcrumbs. It is commonly prepared by breading chicken and then pan-frying or baking it.
This baked version delivers the same cheesy, crispy character while using the oven instead of deep frying.
Can I use Pecorino Romano?
Yes. Pecorino Romano is actually an excellent choice and provides a strong, salty cheese flavor.
Because it can be quite salty, adjust the additional salt accordingly.
Can I use Parmesan instead of Romano?
You can, although the finished dish will have a milder flavor.
For the best result, use a combination of Romano and Parmesan.
Why is my coating falling off?
The chicken may have been too wet, or excess egg may have remained on the surface.
Allow excess egg wash to drip off before pressing the chicken firmly into the breadcrumb mixture.
Why isn’t my crust crispy?
The most common causes are excessive moisture, an overcrowded baking pan, or insufficient surface oil.
Using panko, a wire rack, and a properly preheated oven can help.
Can I make this gluten-free?
Yes.
Use certified gluten-free breadcrumbs and panko.
All other ingredients should be checked individually if you need to avoid gluten completely.
Can I make this without eggs?
A suitable egg-free coating can be made using milk, buttermilk, or another preferred binder.
The texture may differ slightly from the traditional egg wash.
What to Serve With Baked Chicken Romano for Dinner
For a complete family dinner, try this combination:
Main: Baked Chicken Romano
Starch: Garlic mashed potatoes or spaghetti
Vegetable: Roasted broccoli or asparagus
Salad: Italian green salad with lemon vinaigrette
Bread: Warm garlic bread
Dessert: Fresh berries, lemon cake, or a light Italian-style dessert
This combination creates a satisfying meal with contrasting textures and flavors.
Final Thoughts
Baked Chicken Romano is proof that an easy chicken dinner does not have to be boring. With tender chicken breasts, a crisp breadcrumb crust, plenty of Romano and Parmesan cheese, garlic, Italian herbs, and a touch of lemon, this recipe delivers restaurant-style flavor with straightforward preparation.
The secret is in the details: flatten the chicken evenly, season it well, press the cheesy coating firmly onto the surface, give the chicken enough room on the baking pan, and cook it until it reaches the proper internal temperature.
The finished chicken should have a beautifully golden crust on the outside while remaining tender and juicy inside. The Romano cheese provides a bold savory flavor, while Parmesan adds nuttiness and breadcrumbs create the satisfying crunch.
Serve it with pasta and marinara for an Italian-American dinner, pair it with roasted vegetables for a lighter meal, or place it alongside mashed potatoes and salad for classic comfort food.
Whether you’re preparing a quick weeknight dinner or looking for something impressive enough for guests, Baked Chicken Romano (Cheesy) is a versatile recipe worth keeping in your regular meal rotation.